PVKII Player Guide
Table of Contents
  |
MOTD Upon
joining a server, you will see the Message Of The Day screen. Read this
carefully, many server operators use the MOTD to explain their rules. Teams After
the MOTD screen, you will have the opportunity to select a team.
Choose to be a Pirate, Viking, or Knight. You can look at the scoreboard ('Tab' by Default) to see which team has the least number of players. You may also choose Auto-Assign if you can't decide which team to join.
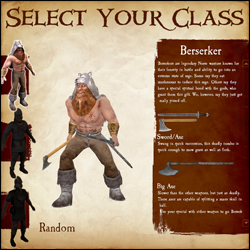
Classes
After selecting a team, you will have your choice of which class to play. As you hover over each class, a list of that class's weapons and general descriptions of each will show on the right. If you still can't decide which class to play, select random.
Kill stuff That's
its! If all has gone well, you have now spawned and are ready to do
some serious fragging. Go look for some enemies and stick a sword in 'em.
For more in-depth information on objectives, see Section 4. Game
Modes. For more information about sticking swords in people, see
Section 3. Combat. |
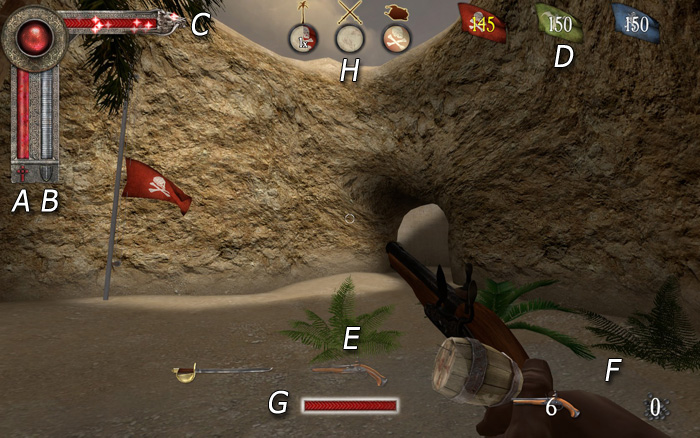
a) Health bar
The current amount of health you have.
b) Armor bar
The current amount of armor you have.
c) Special attack bar
The
special attack bar fills partially whenever you damage an enemy. Once full, the
eye will light up and you will now have the oportunity to use a special
attack; each class has a different special. See Section 5. Classes for descriptions of all special attacks available.
d) Round Counter
On
some maps, a round counter may appear. This counter displays how close
each team is to winning the round. The first team to reach zero wins.
e) Weapon select
By default, use the scroll wheel to see the weapon selection panel. Scroll through the weapons to find the one you want.
f) Ammo
On
the lower right you'll find the ammunition counter. This can be crossbow bolts, longbow arrows, throwing axes, blunderbuss shots, javelins
or pistols. For the flintlock pistol, there are two icons - one of them
represents how many pistols you have loaded and the other is how many
bullets you have for reloading.
G) Power Meter
This meter represents the power charge of your weapon. You can charge your melee and ranged attacks to do more damage. Be careful when charging your weapon, if held for too long the bar will go back down and your attack won't be at full power.
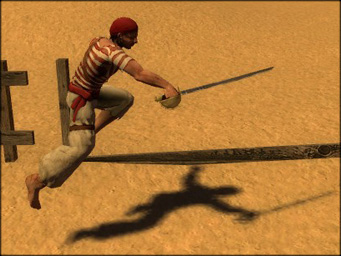
a) Attacking
b) Blocking
- Melee - Hold your attack button (Default Mouse1) to charge your attack, release the button to swing. Attacking with a melee weapon can be done in one of four directions. Choosing a direction to swing corresponds to your movement when first charging the attack. Moving left swings Right -> Left, moving right swings Left -> Right, forward is an Overhead chop and moving backwards is a stab.
Hit detection now takes into account the weapon's arc. With a big enough arc (most two-handed weapons) it is possible to hit multiple opponents who are close enough together.
Hitting an opponent with a 100% charged attack will break their block and deal damage; this also has a chance of stunning them. - Ranged - When using the throwing axes or longbow, you need to charge the weapon fully for maximum damage and distance. When aiming at distant targets, keep in mind the arc of the projectile and the time it will take to get there. This is especially important if your opponent is moving.
Pistols are more accurate when standing still, and the blunderbuss has a limited range due to shot spread; the closer the opponent is, the more damage it will do. - Special Attacks - Keep an eye on your special meter; it will slowly fill as you do damage to your oponents. When the metere is full, use your special by hitting your special button (Default Mouse3). Not all weapons have a special, check Section 5. Classes for more info.
b) Blocking
- Parrying - You can parry with any melee weapon (Default Mouse2) in one of four directions. The direction you block will be automatically chosen for you; this will depend on the attack direction of your closest enemy.
- Shield Blocks - Shields can be used to block (Default Mouse2) both ranged and melee. While blocking, the player may hit their attack button to bash the enemy with their shield. You may also charge your shield bash as you would a normal attack.
- Counter Attacking - After a 'Perfect Parry' the player can hit their attack button to do a quick counter attack. The opponent will be stunned and unable to block.
- Weapon Sizes - The size of your weapon vs. your opponents weapon will decide how well you can parry.
Small weapons cannot 'Perfect Parry' large ones, but will reduce the damage taken when performing a successful parry.
| Team Deathmatch
The simplest game mode of them all - Kill everyone
you see who is not on your team. The team with the highest score at the end of the round wins. Booty
The objective of booty mode is to infiltrate the enemy bases and
bring back as many chests as you can to your own base. Every chest at
your base will lower the counter. The first team to reach zero on this
counter wins the round. On some maps, a particular team may start with
all of the chests with the objective of defending them from the other
teams who have no chests. To compensate for the advantage, the team
will have a much higher counter. In other maps there may be chests in areas of the map outside of team zones. The effective team must strike a balance
between offense and defense, for if everyone is on offense, an enemy
may steal chests from the base while no one is there. Should everyone
be concentrated on defense, there is no possibility of obtaining more
chests. Capturing a chest that was previousl owned by another team will remove 5 tickets from your counter and add 5 to theirs. First team to hit 0 tickets wins. Use your special while carrying a chest to gain a speed boost for a few seconds. Territory
Territory is exactly as the name says. The objective is to capture and hold the territories throughout the map. Once a territory is captured, it will count down that team's tickets. The more territories your team holds, the fast your counter goes down. In some maps, holding all of the territories at once will initiate a final countdown; if your team holds all of the territories for the duration of that countdown, you win automatically. Otherwise, the first team to reach 0 wins the game. Objective Push
This is an interesting game mode as it will change depending on the map. Mappers have free reign to make anything an objective as long as it has an input/output ability. The designated team that defends must hold out until the timer hits zero, the designated attackers must complete the objectives before the timer reaches zero. If you're a mapper, check here for a quick guide.
Holy Grail
Somewhere in the map is the holiest of grails. You must find this unique item and take it from whoever (or whatever) currently holds it. While holding the grail, you and your teammates will be buffed by its holy power and must slay a designated amount of teammates to win the round. Only kills done by a team member that is under the grail's buffs will count towards their tickets. Last Team Standing
The name is pretty self explanatory. Kill all your opponents by the time the timer runs down and you win the round. If the timer hits zero, Sudden Death begins and there's no telling what might happen!
|
Skirmisher
Captain
Berserker
Huscarl
Gestir
Heavy Knight
Archer
The scurvy-infested dogs of any pirate crew. Despite having a powderkeg strapped to their back, these guys are quick!
 |
Cutlass Your standard pirate sword. The Skirmisher's cutlass is light, quick and deadly. Use your special for a powerful Lunge. Flintlock Pistols Because of their slow reloading time, many pirates carry six loaded pistols which can be fired relatively quickly. Powderkeg A keg full of highly explosive black powder. The keg can be lit by the Mouse1 button. Once lit, press Mouse1 again to toss the keg. |
Captain
Don't let the peg leg fool you. Captains are as deadly as their crew and as thirsty for booty as any pirate. Armed with their parrot companion, these guys don't go down without a fight.
 |
Captain's Cutlass More powerful than your average cutlass, the captain knows how to use it to take down even the strongest of opponents. Blunderbuss Although it only holds one shot, the captain comes equipped with backup ammo and has mastered the art of reloading with a hook. These shotgun-esque weapons are deadly up-close and come with your standard warranty. Use your special to load a deadly, exploding shot! Parrot/Hook This parrot was trained to peck and makes for an excellent diversion. When in desperate close-quarters combat (or looking to embarass your opponent) the hook may also be used to gouge and punch. |
Berserker
Berserkers are legendary Norse warriors known for their ferosity in
battle and ability to go into an extreme state of rage. Some say they
eat mushrooms to induce this rage. Others say they have a special
spirtual bond with the gods, who grant them this gift. We, however, say
they just get really pissed off.

|
Sword/Axe Swung in quick succession, this deadly combo is quick enough to mow grass as well as flesh. 2-Handed Axe Slower than the other weapons, but just as deadly. These axes are capable of splitting a mans skull in half. Special Attack
Use the special attack button to go into a berserker rage. While in
this state, you gain strength, speed, health, and the uncanny desire to
howl like a wolf. But beware, for after the rage has ended, the gained
health will be lost; many berserkers have died after their rage has ended. |
Huscarl
A moderately armored viking with ranged capabilities and a shield to guard against the attacks of all opponents. The Huscarl may not be as crazy as the Berserker, but maybe that's a good thing. What lunatic goes into combat shirtless anyway!

|
Two-Handed Axe Faster than most two-handed weapons, this axe can quickly take down lightly armored veterans and noobs alike. Sword & Shield Nothing stops a ranged assault better than a warriors shield. Besure to use during melee situations as well, a well timed bash can really mess up your opponent's vision. Use your special to shield-charge your opponents. Throwing Axes What do you call a Viking with throwing axes? Deadly. These babies will have your enemies running in fear, unfortunately for them the axes are faster (don't forget about gravity when throwing long distances).
|
Gestir
An experienced combatant with a long pointy spear and a short pointy beard. Don't let the grey hair fool you, this is one tough bastard!

|
Spear Long and quick, the spear can be used to easily keep enemies at bay. Can be used to do quick attacks, though sometimes it's good to get in a full charge for maximum damage and pushback. Use your special with this weapon for a deadly spear charge! Langseax & Shield The Langseax was originally intended as a tool for around the camp, but quickly became a weapon in the Vikings' arsenal. Combined with a shield, the langseax can be a deadly tool for slicing an opponent's flesh while still defending against a counter attack. Javelins Javelins are the premier viking ranged weapon. These weapons pack a serious punch and can be thrown long distances when the player charges them fully. The charge on your Javelin is not like other ranged weapons, it relies on forward momentum for maximum effect.
|
Heavy Knight
Like a medieval version of a tank, these elite troops are capable of withstanding a tremendous amount of damage and can dish out almost the same.
 |
2-Handed Sword A really long sword. Is he making up for something? We think not. I wouldn't ask either, the sword hurts enough when he isn't angry! Use your special to do a 360 degree spin, damaging all opponents within range! Sword and Shield The shield can be used to bash enemies, temporarily stunning them. Use this time to wack them with the sword.
|
Archer
The Crème de Cacao (Chocolate Bean?) of the Knight's Arsenal. These guys may not be the burliest of men, but they know how to make killing look good.
 |
Short Sword A small but quick sword to be used only when absolutely necessary. Archers hate getting bloody! Crossbow This baby packs a powerful punch but a slow reload, so be aware of your surroundings. Why is it so inaccuracte? Try aiming it dummy! (Mouse2) Longbow
The Archer's calling card. Let's see a pirate chase you down with an arrow in his good eye. Use the advanced crosshair to your advantage when judging the effect gravity will have on your arrows. Use your special to load 3 powerful arrows in one shot! |
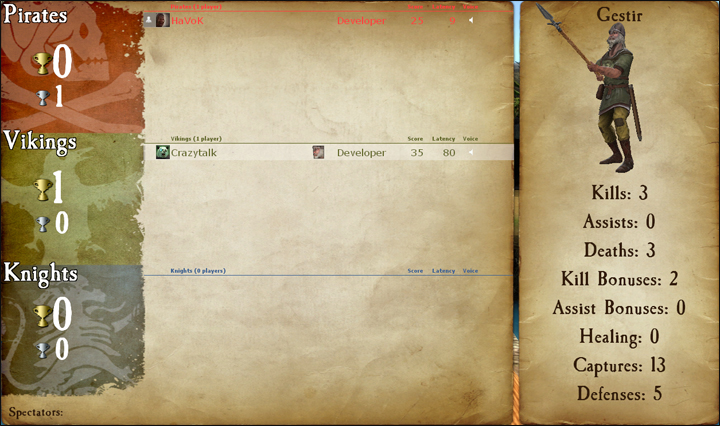
Team Scores
Players
Score Breakdown
The left most side of the scoreboard lists the three teams with their appropriate flag backgrounds. The larger number next to the gold trophy icon is the number of times that team has placed first in the map. The second number, next to the silver trophy, is the number of times that team has placed second. There is no trophy for third place, because third place doesn't count for anything!
Players
The next section of the scoreboard displays the players. The players are separated by which team they are on and are arranged, in descending order, by score.
The first icon represents the player's avatar; if that player is a steam friend of yours they will also have a friend icon attached to their avatar.
Next to the avatar is the player's steam name.
The icon next in line is that player's class icon. Check the scoreboard to see which classes are already being played on your team.
Next to the player's icon is a section for showing when a player has died. This section may also have a tag under it for Developers, Testers, Contributors and Donators.
The section to the right of here is reserved for Score and Latency, as well as a speaker icon that shows when a player is using their mic. Click on the speaker icon to mute a player's microphone and text chat.
Score Breakdown
The section on the right side of the scoreboard is your personal score breakdown. This is displayed under the name and 3D representation of the class you are currently playing.
- Kills - The number of enemies whom you have killed.
- Assists - Your kill assists. You get an assist any time you were the last to damage a player within a few seconds of a teammate killing them.
- Death - The number of deaths you've suffered. (Good thing it's just a game!)
- Kill Bonuses - You get kill bonuses from things like getting revenge in last team standing, grail kills, etc.
- Assist Bonuses - Just like kill bonuses, but when you get the assist.
- Healing - Points you get from healing your teammates. Not currently used.
- Captures - You gain capture points from completing objectives. This includes capturing a chest, capturing a territory, etc.
- Defenses - The number of times you've defended an objective. This could be returning a stolen chest, defending a territory, etc.
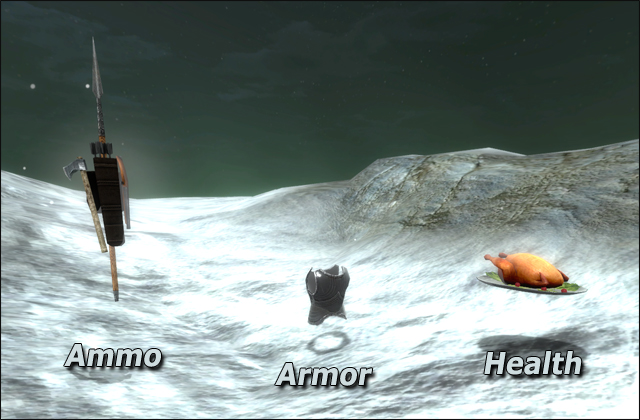
Food
Armor/Ammo
Look around the map for plates of delicious chicken to restore your health. Don't be frightened by the much anticipated burp that comes after downing an entire chicken in half a second. What a pig you've become!
Armor/Ammo
Armor and Ammo are strategically placed throughout each map. Armor is important for absorbing damage and ranged weapons don't work without ammo!